
You will need to perform the following steps to setup Amazon SES with SendX platform:
-
Sign up for Amazon SES and get you credentials
-
Setup Amazon SES
-
Setup Bounce handling
-
Setup Complaint handling
-
Setup DKIM
Sign up for Amazon SES and getting your credentials
-
Visit Amazon Web Services (AWS) and sign up for an AWS account.
-
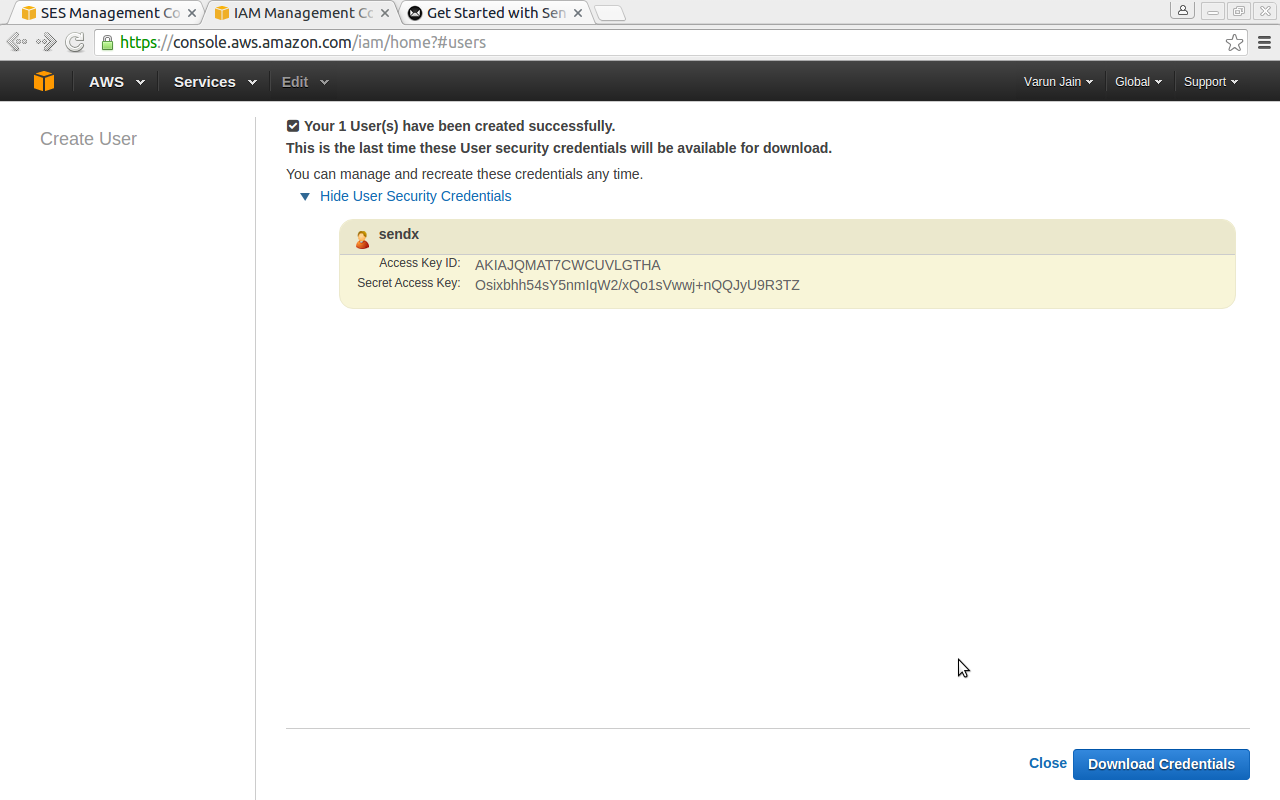
Once signed up, you need to retrieve your 'Access Credentials' from your AWS account. These are the set of "keys" to allow SendX to send emails via your Amazon SES account. Start by creating an IAM (Identity and Access Management) user in your IAM console.Click the Create New Users button Type "sendx" in the first field, then click the Create button.
-
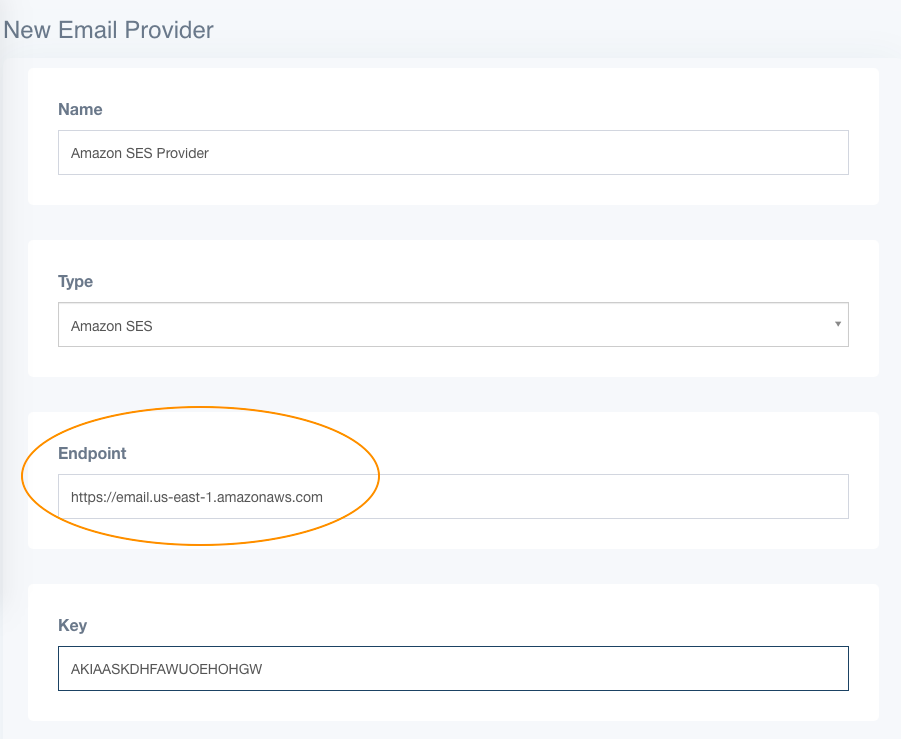
Copy your Access Key ID and Secret Access Key from the screen that follows and paste it into SendX's Settings > New Provider. Save your Settings in SendX then return to your IAM console to close the credentials window. Also, the endpoint field should point to Amazon SES HTTP API endpoint based on the availability zone of your service, like:
https://email.us-east-1.amazonaws.com
https://email.us-west-1.amazonaws.com
IMPORTANT: Do not skip the remaining steps, otherwise your quota will show up as zeros in SendX.
-
You now need to "Attach Policy" to your Access Credentials to allow SendX full SES access.
-
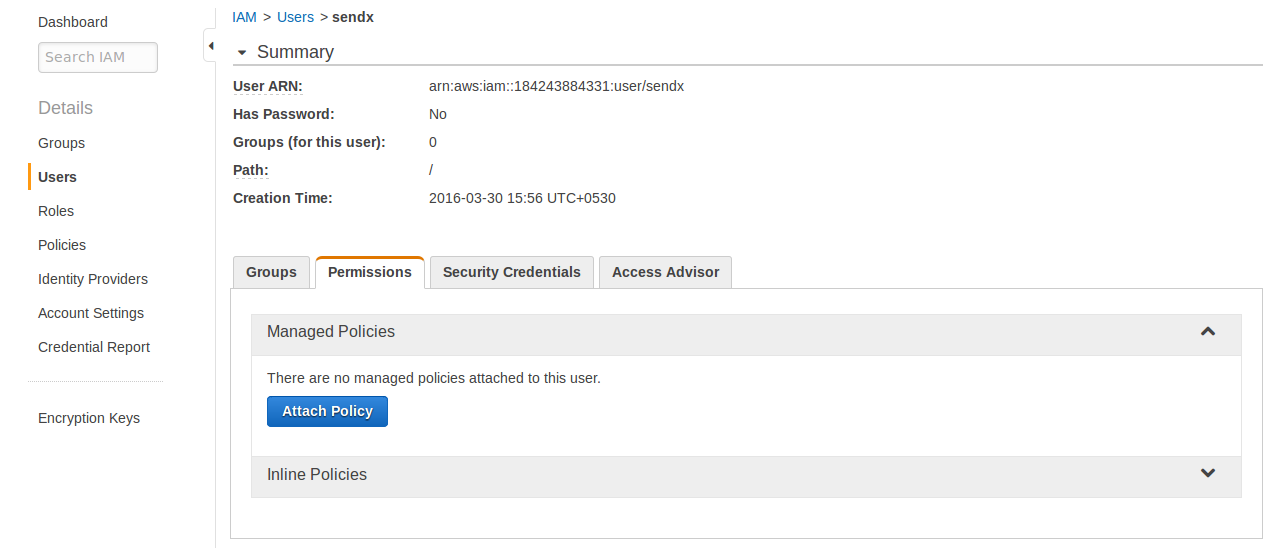
In your IAM console, click on "sendx".
-
In the next page, click on the 'Permissions' tab, then click the Attach Policy button.
-
Search for AmazonSESFullAccess, then click the checkbox next to the AmazonSESFullAccess item. Then click Attach Policy at the bottom of the screen.
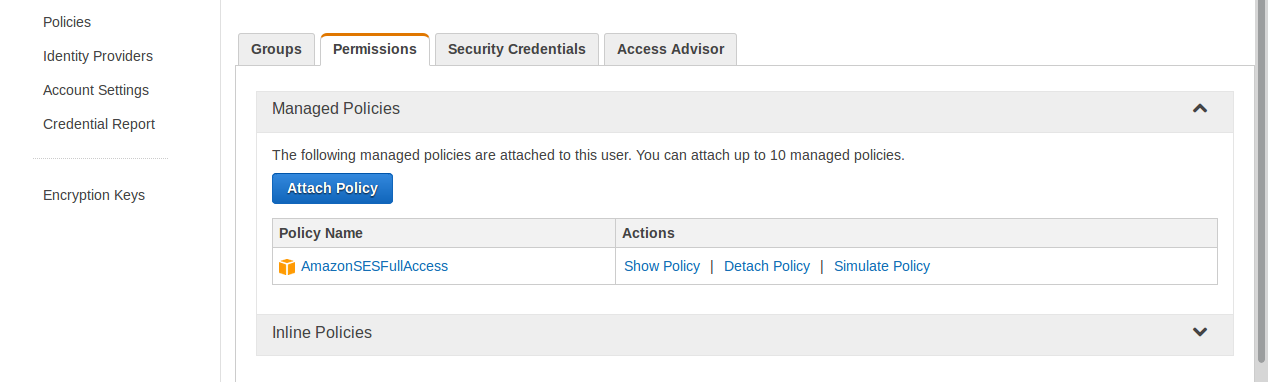
You've successfully created your Access Credentials, saved them in SendX and allowed SendX full access to Amazon SES.
Setup Amazon SES
In order to start sending bulk emails, you need to verify your sending emails or domains and increase your SES Sending Limits.
-
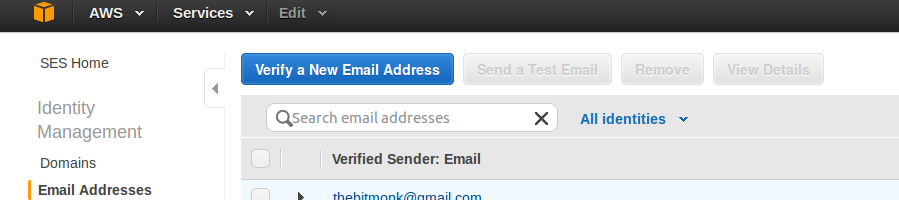
Verify your sending email address in your Amazon SES console > Verified Senders > Email Addresses. Say you're going to use yourname@domain.com to send newsletters in SendX, verify yourname@domain.com in your SES console. Click the Verify a New Email Address button and follow the instructions.
Tip: If you want to send from any email address belonging to a particular domain without having to verify each email address, verify your sending domain instead (see #2 below).
-
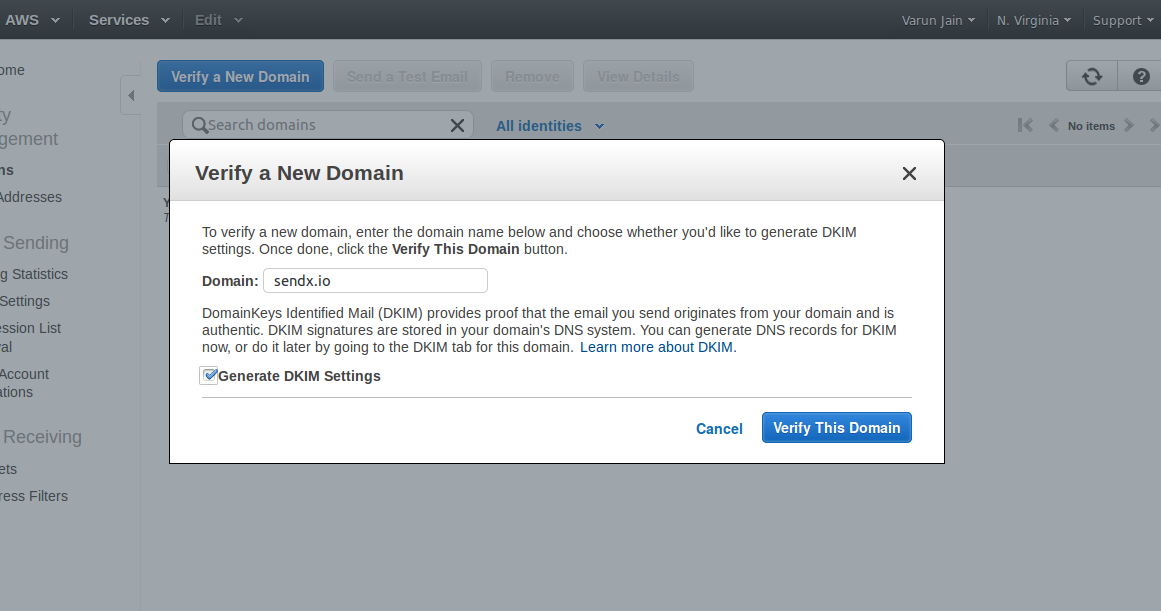
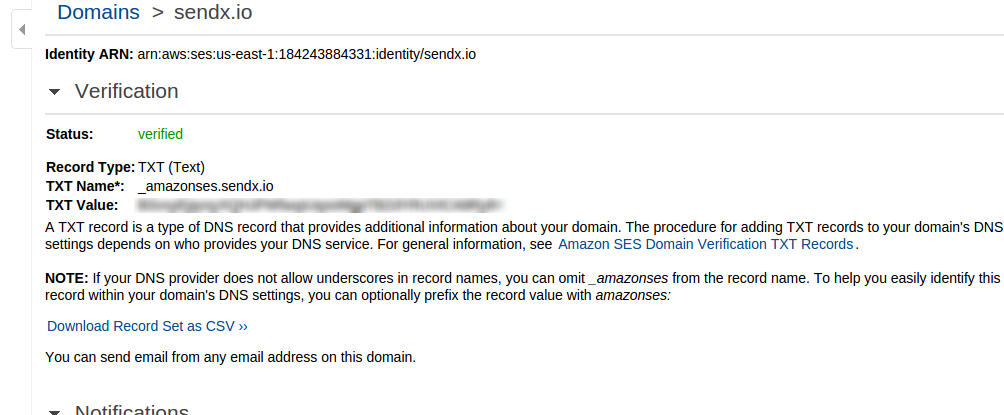
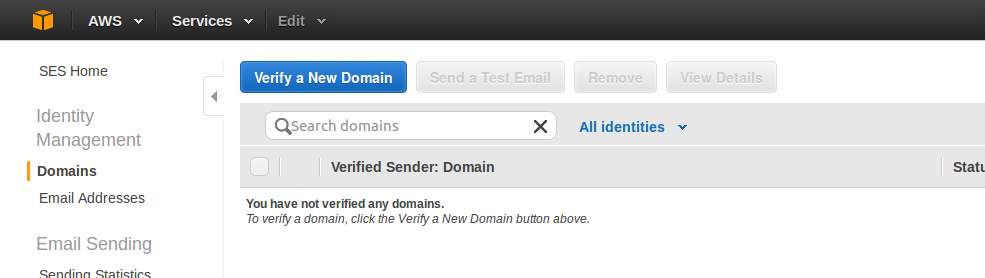
To verify your sending domain, go to your Amazon SES console > Verified Senders > Domains. Then click the Verify a New Domain button and follow the instructions. By verifying your sending domain, you can send from any email address belonging to this domain without verifying them in #1.

Note: Do not verify your domain with 'www' prepended to your domain. Eg. if your domain is mydomain.com, verify mydomain.com and not www.mydomain.com unless your email looks like this name@www.mydomain.com (which is rarely the case).
Also for setting up DKIM select Generate DKIM Settings checkbox
After clicking verify new domain you should see the following screen:
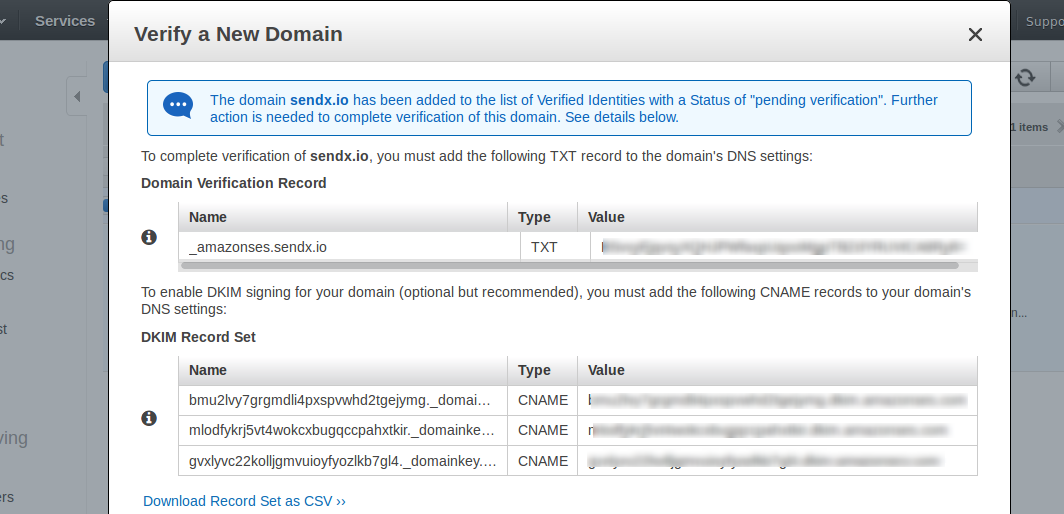
You shall have to add these entries as TXT and CNAME records to your domain's DNS setting. If faced with any issues contact your DNS provider admin.
So before DNS records are updated/reflected you shall see status as pending for domain verification.
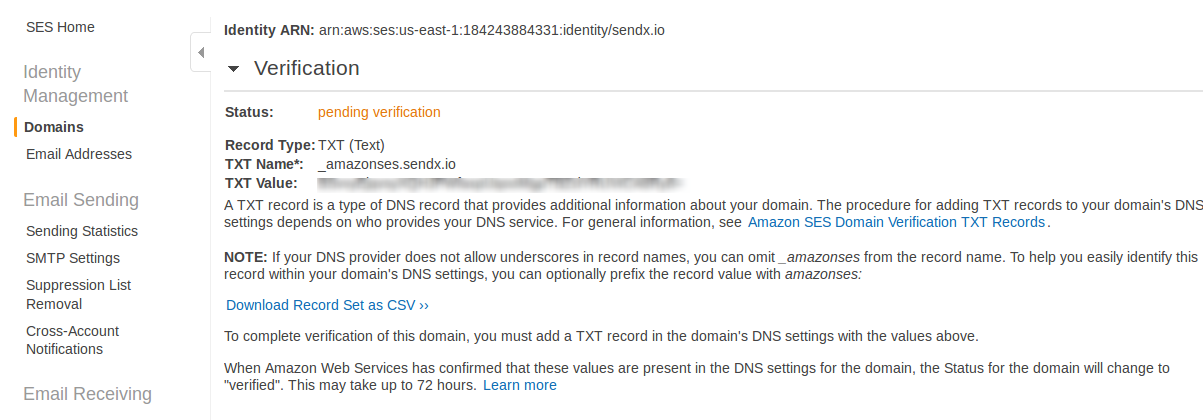
Once your domain has been verified Amazon shall send you a mail:

post which you can see the domain status is marked as verified
-
Now, you'll need to request Amazon to increase your SES Sending Limits to get your Amazon SES account out of "sandbox mode". You'll then be able to send to and from any email address as well as raise your daily sending limits from 200 per day to a number you need.
Setup Bounce handling
Amazon SNS is required to track bounces & complaints. If an email bounced, the email address will be flagged in SendX so that future newsletters won't be sent to them again. To make this possible, here's what you need to do:
-
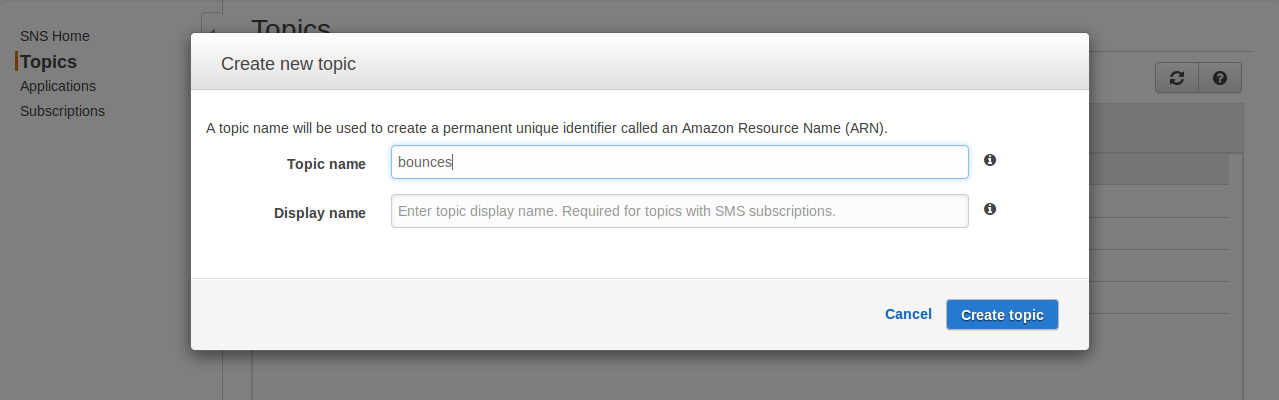
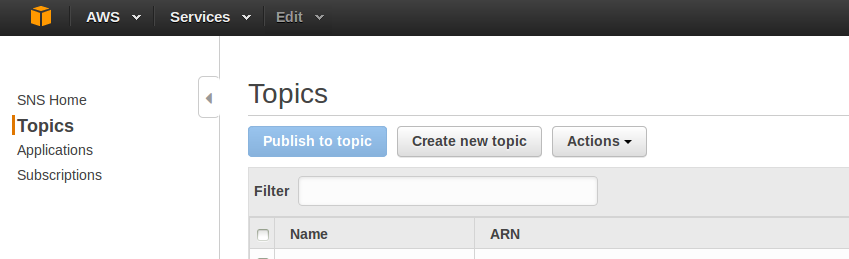
Go to your SNS console, click Topics on the left sidebar, then click the Create new topic button.

-
Name it bounces and leave the Display name blank, then click the Create topic button.
-
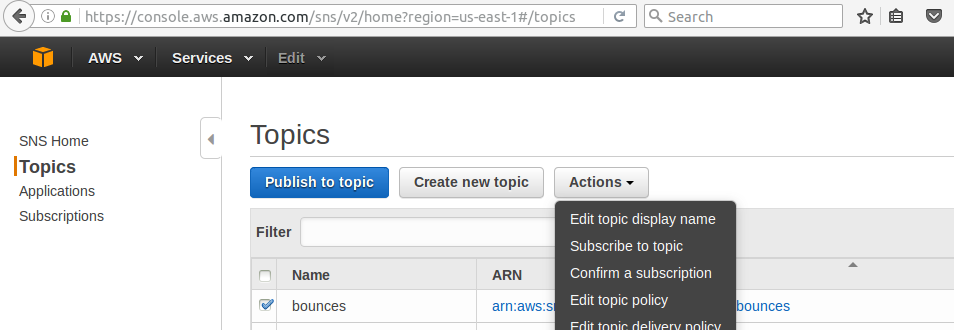
After creating the topic bounces, click the 'bounces' checkbox then click the Actions button, then click Subscribe to topic.
-
Now you need to populate the Endpoint field. For that, you need to get Team ID from SendX > Settings
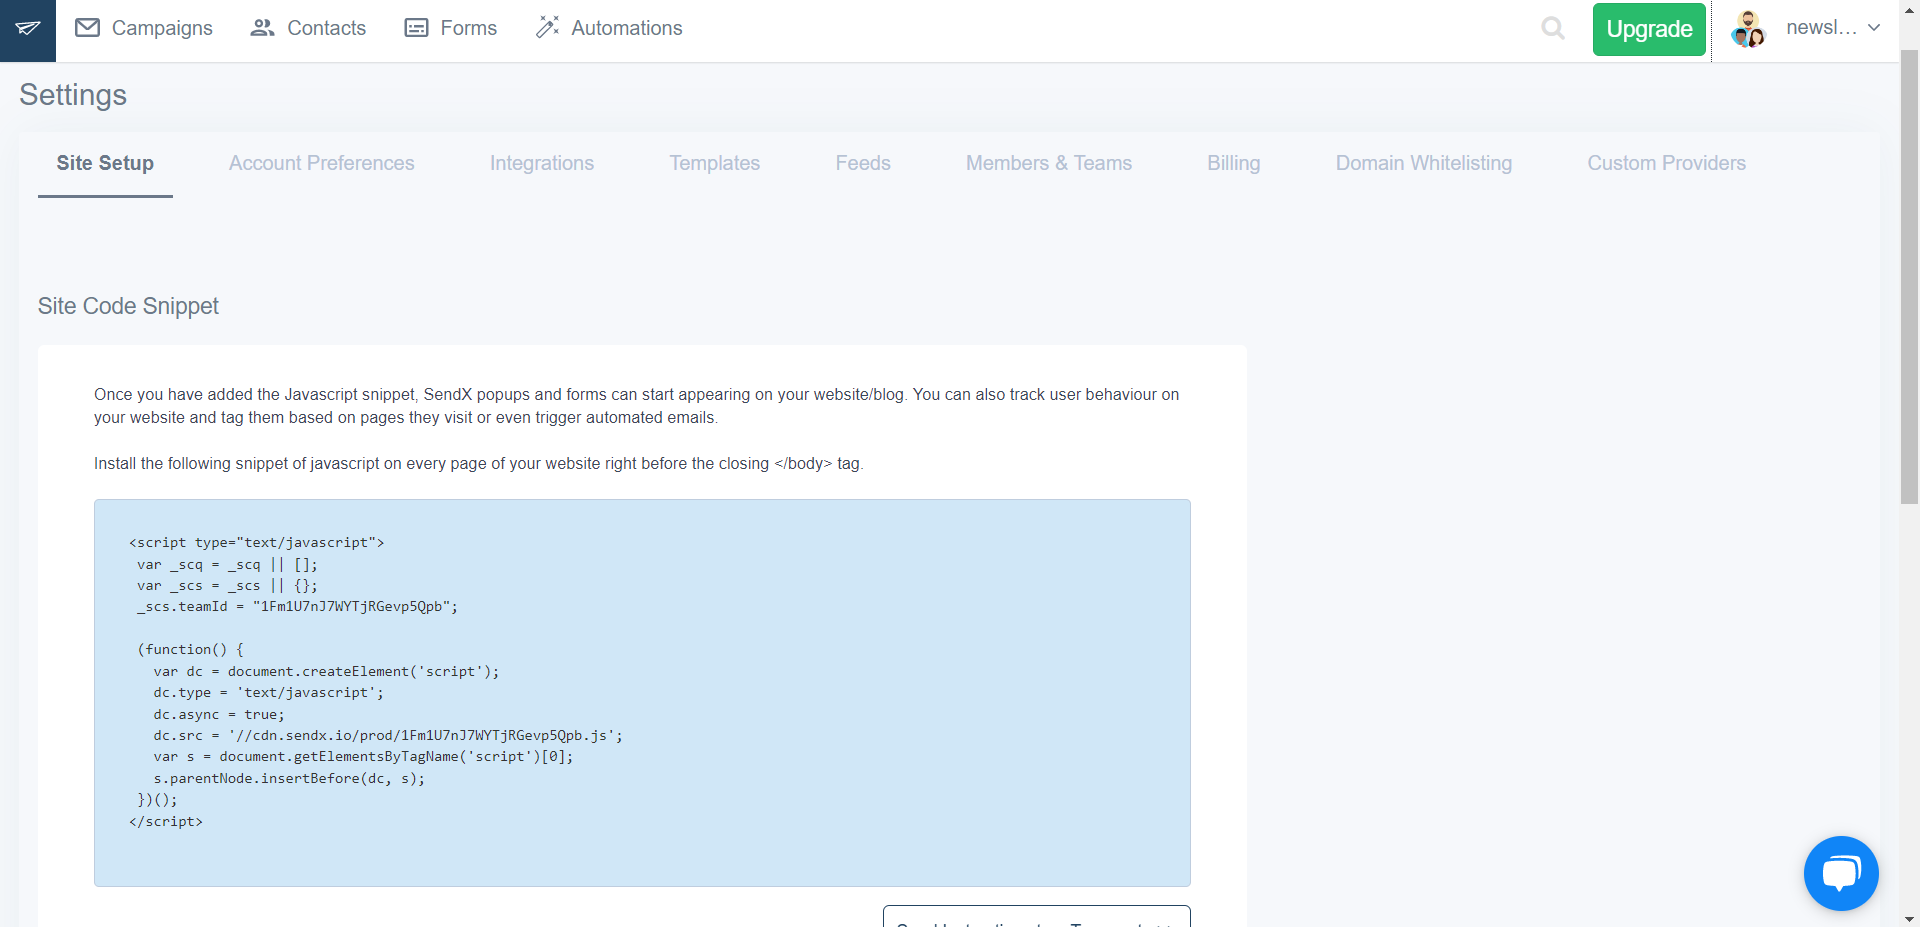 So say if your Team ID is X9EXT0OIqqZ4GOF5n2Lqi your endpoint shall be https://app.sendx.io/api/v1/ses/bounce/X9EXT0OIqqZ4GOF5n2Lqi
-
Click the Create subscription button. SendX will instantly confirm the subscription.
-
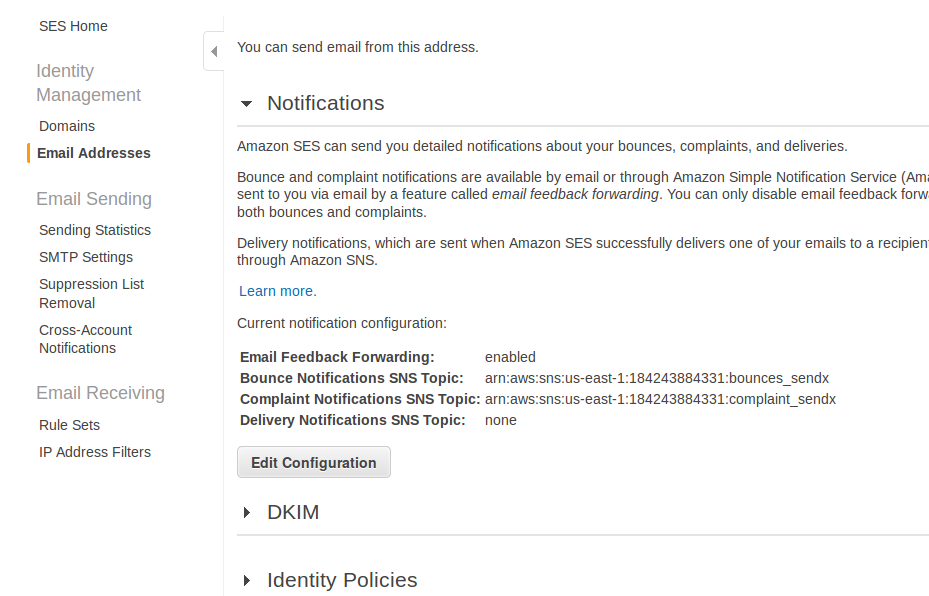
Go to your Amazon SES console > Verified Senders > Email Addresses and click on the email you attempted to verify. If you verified a domain, go to Amazon SES console > Verified Senders > Domains and click on the domain you attempted to verify.
-
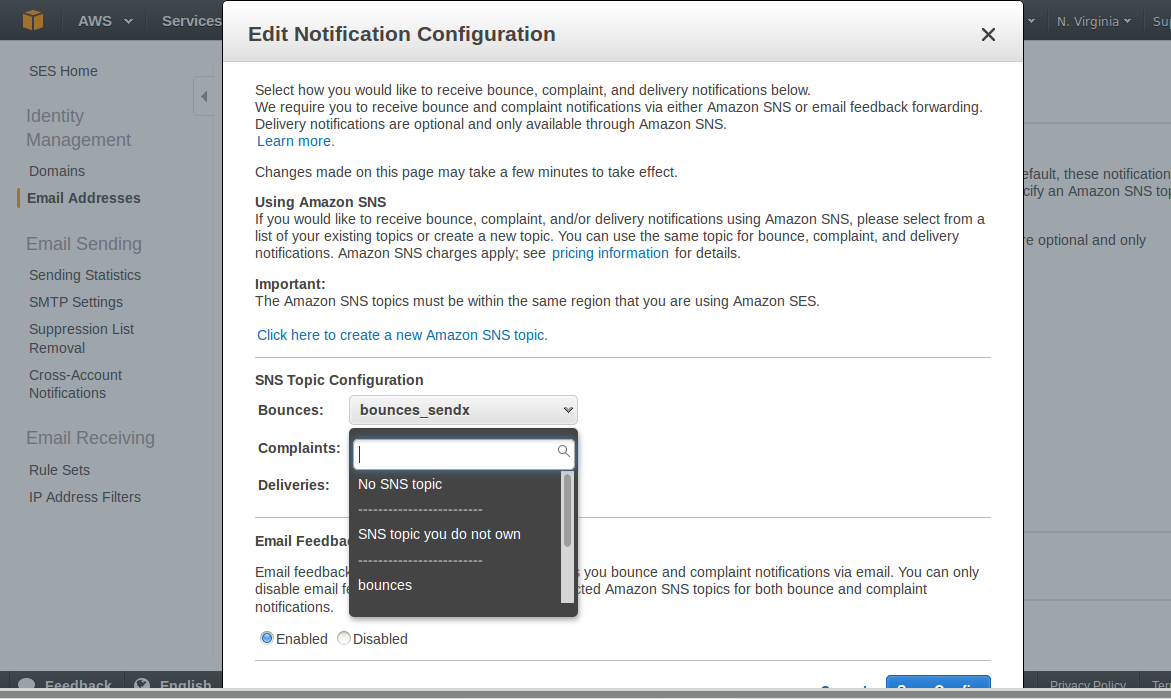
Under 'Notifications', click Edit Configuration.
-
Under 'SNS Topic Configuration', click the Bounces drop-down menu and select bounces (which is what you've created previously in your SNS console).
-
Repeat #5 to #7 for every email and/or domain you've previously verified in your SES console.
Done! All email bounces will now be tracked and handled when you send emails in SendX.
Setup Complaint handling
If a user marks your email as spam, they will be flagged in SendX so that future newsletters won't be sent to them again.
The following steps to setup complaints handling are identical to bounce handling in the previous step:
-
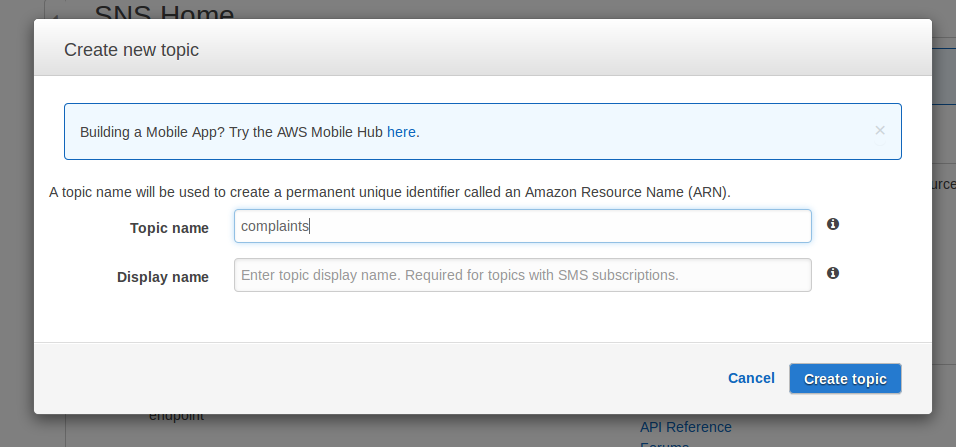
Go to your SNS console, click Topics on the left sidebar, then click the Create new topic button.
-
Name it complaints and leave the Display name blank, then click the Create topic button..
-
After creating the topic complaints, click the 'complaints' checkbox then click the Actions button, then click Subscribe to topic.
-
Now you need to populate the Endpoint field. For that, you need to get Team API Key from SendX > Settings
 So say if your Team API Key is X9EXT0OIqqZ4GOF5n2Lqi your endpoint shall be https://app.sendx.io/api/v1/ses/complaint/X9EXT0OIqqZ4GOF5n2Lqi .
-
Click the Create subscription button. SendX will instantly confirm the subscription.
-
Go to your Amazon SES console > Verified Senders > Email Addresses and click on the email you attempted to verify. If you verified a domain, go to Amazon SES console > Verified Senders > Domains and click on the domain you attempted to verify.

-
Under 'Notifications', click Edit Configuration.

-
Under 'SNS Topic Configuration', click the Complaints drop-down menu, scroll down and select complaints (which is what you've created previously in your SNS console).

-
Repeat #5 to #7 for every email and/or domain you've previously verified in your SES console.
By now, you should have setup bounces and complaints for every verified email and/or domain.
Setup DKIM
DomainKeys Identified Mail (DKIM) lets an organization take responsibility for a message that is in transit. The organization is a handler of the message, either as its originator or as an intermediary. Their reputation is the basis for evaluating whether to trust the message for further handlings, such as delivery. Technically DKIM provides a method for validating a domain name identity that is associated with a message through cryptographic authentication.
Setting DKIM keys ensures better deliverability, and higher email open rates and reduces chances of your mail being reported as spam
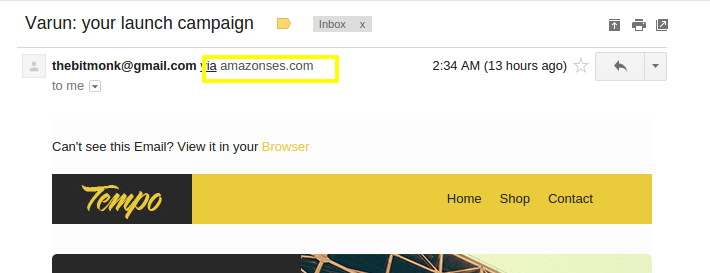
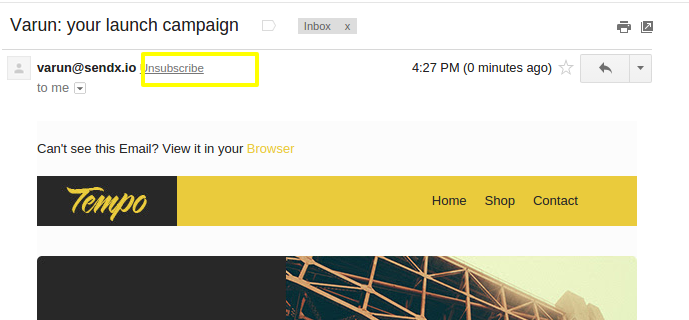
So if you have not set your DKIM keys properly then any mail send to them using your amazon keys from address somename@mydomain.com shall be seen as:
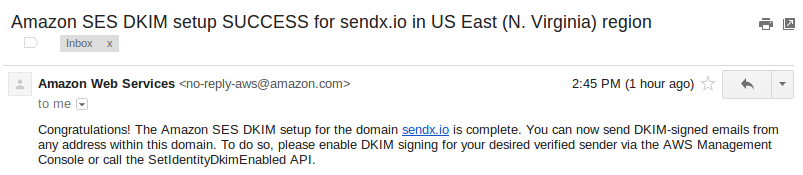
Once you have entered your DKIM records in DNS provider settings and once DKIM settings have been verified you shall get a mail from AWS:
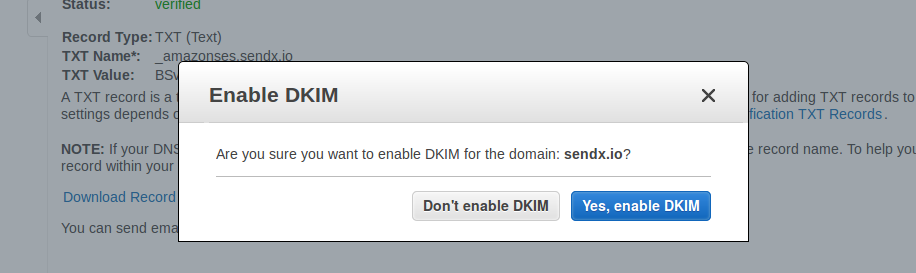
Now if you head to AWS console > Domains > Your domain > DKIM you will see that DKIM has been verified but is still disabled
Click on enable option and you will see a pop-up
After enabling DKIM its status should be enabled and verification status should be verified. Post this any emails which are being sent from any address belonging to @mydomain.com shall not have via amazonses.com listed.
Cheers! Now you are all set to build a long lasting relationship and business by using SendX platform alongside SES
Did this answer your question?